When you visit an art show or a museum and see beautiful drawings of various artists had been put to display you instantly feel like doing such creativity yourself too, don’t you? Well, we understand your zeal for drawing when you encounter such a situation where you just want to draw something but suck at it! You must have heard that “you must learn to walk before you can run” and believe us, it applies in every aspect of our lives, even at drawings or sketching. So, what should you try out as first? Surely not a hard drawing like a portrait or stuff! Start small by doodling some easy peasy drawing such as flowers. Remember the time in your childhood when you use to scribble flower drawings but they used to be uneven and maybe at times shabby as if they were not flowers. Don’t worry, you won’t be getting into that situation again as we bring you these Easy Flower Pencil Drawings for Inspiration.
Here we bring for you New Acrylic Paintings to Admire and it will inspire you to try your hands on one of these pieces and see some magic.

Easy Flower Pencil Drawings for Inspiration
How To Draw A Rose


Although beautiful artistic drawing of rose looks damn difficult, you need to start from the easy ones to reach that level. Here a step-by-step guide to drawing a rose easily.
• Initially draw three concentric light freehand circles as a guideline so that you understand the proportion of the rose and its leaves.
• Then draw spiral lines into the smallest circle and create a petal-like structure that gets out of that guideline circle.
• Draw some petals like a broadened heart-like shape and continue doing it till you reach the second guideline circle.
• Now mark eight small lines as a reference to the starting of the leaves on the outer edge of the rose petals and eight points further on the outer circle for the tips of the leaves.
• Join these lines and create leaves. Do some shading with your pencil and the then smudge it with the help of a Q-tip.
How To Draw A Daisy
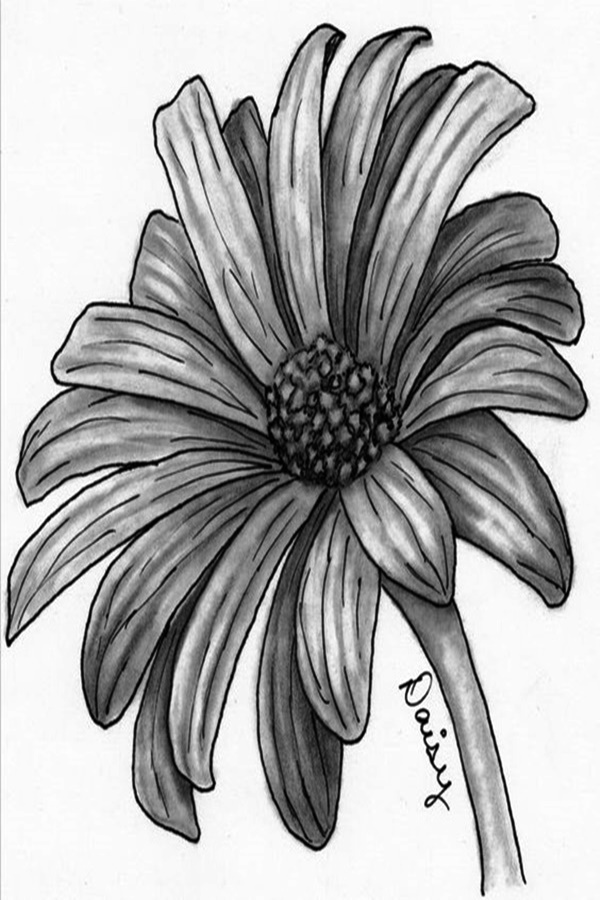

Drawing a daisy is easy and similar to drawing a rose. It is all about knowing the proportions of the flowers and that you can easily do with the help of guidelines.
• Start with drawing a larger circle and a smaller circle inside it
• Use the inner circle and draw the center of the flower
• Then draw flower petals from the edge of the inner circle to the inner edge of the outer circle.
• Then draw a stem and some leaves to complete the drawing.
• You may then shade the flower with the same pencil or use a different type of colors like crayon, pencil colors, or watercolors.
We look for various art and different variations to incorporate into our designs. Here we have compiled for you a list of some Wonderful Raining Umbrella painting ideas for your cute and loved umbrella.
How To Draw A Tulip


• Drawing a tulip flower will not require you to have too many guideline circles.
• Draw a circle on the size you want your flower to be
• Then draw a slightly curved stem and along the curves draw some leaves having wavy structure advancing towards the circle.
• Now carefully draw the petals and darken all the outlines of the drawing.
• Enhance the look of the flower by adding up some lines in the flower and petals, and then color it or shade it.
How To Draw A Cosmos Flower
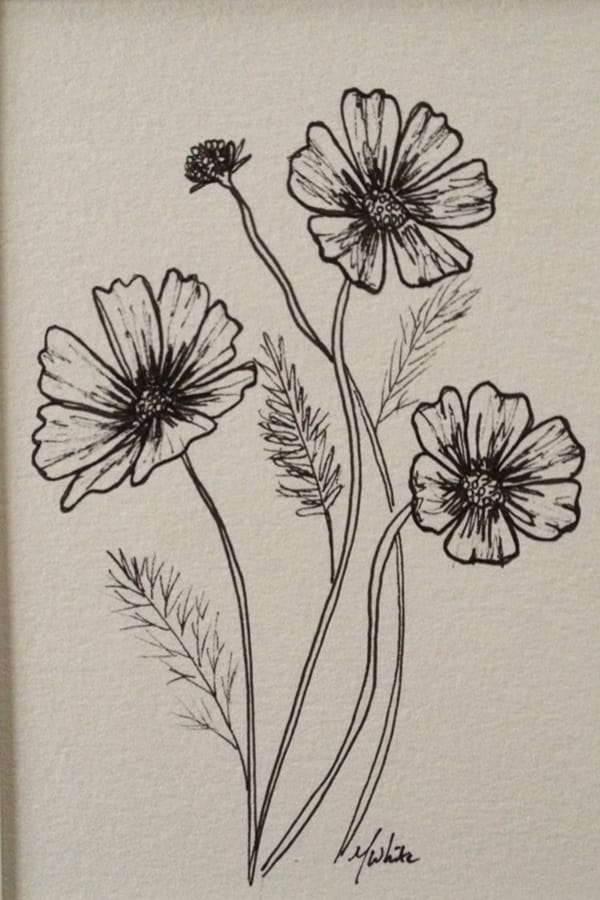

Drawing a cosmos flower would be a little difficult than the ones mentioned above, nevertheless, they are easy and can be sketched by anybody.
• Make two concentric circles having a gap of at least 1 cm.
• Draw the outermost circle as far as you want the length of the flower petals.
• Make many semi-circular designs around the innermost circle and make a shabby circle inside it.
• Then start making the petals, which are almost of the same size and draw a stem as well.
• Draw the outlines of the sketch in which the outer petals hide the inner ones.
• Paint it as you want and voila! You have your drawing complete.
If you are someone who loves journaling and documenting life then urban sketching for Beginners is a brilliant idea to start off.
How To Make A Daffodil


Last but not the least we have daffodils on our list. As we feel, quoting William Wordsworth, “And then my heart with pleasure fills, And dances with the daffodils.” Your heart too will dance with rejoicing on having been successfully reaching to this drawing. To draw daffodils follow these steps –
• Make a circle and then draw an oval that is slightly cutting the circle on the north-west direction.
• Then draw two parallel lines to join the middle of the circle and the outer edges of the oval. This will make the flower while the circle will be a reference to the sketching of the leaves.
• Draw a small oval inside the oval drawing earlier and then create a rough sketch of the daffodil flower.
• Draw a steam and some leaves on both the side of the stems
• Make some lines to invest realism in the drawings and then color it using watercolors or pencil colors.
• Shade it using your imagination and voila! You have a daffodil flower.


How To Shade Flower For Beginners
You can add the illusion of depth to flower pencil drawings with shading. To give your drawing a realistic look, excel three things – pressure control, smooth shading and using lighting behavior to your advantage. Pressure control is learned by going from shade light to dark, the harder you press the pencil, the darker the shade. To practice pressure control, start from one end of paper to another, sketch a series of light and dark with varying pressure. Maintain pressure consistency while moving back and forth. Smooth shading is achieved when there are no gaps between each back and forth strokes. If your pencil is sharp, it is hard to eliminate gaps. Use blunt tip or side of pencil tip for smooth and thick shading. Knowing where to correctly add light or dark shade, is another game changer in sketching.
Flower pencil drawings mostly contain spiral strokes, shaded petals and shadows. For a 3D effect of the petals, give it some flaws. Try to avoid keeping everything uniform. Smudge the edges using a paper cone or fingers to smooth the pencil strokes.
Shading Techniques For Beginners
There are many pencil shading techniques like outline, hatching, cross hatching, stippling and back & forth strokes.
1) Outline – Two different types of outlines are light and dark. Light outline is used to get the idea of the shape we plan to draw. Use the lightest shade of pencil. Dark outline is often used to draw details of the sketch like shadow highlights. We apply varying pressure on the pencil to get the desired outline.

2) Hatching – Hatching is about small strokes in the same direction that gives a shading effect. Draw light strokes by keeping distance between each stroke. When we minimize the distance between strokes, we get a darker shade. Hatching is often done by moving from lighter shade to darker shade.

3) Cross Hatching – Lines drawn in crossing direction of hatching technique is cross hatching technique. Often used for contouring, shadow projection.

4) Stippling – A technique with numerous dots in a proximity is stippling. Stippling is used in flower pencil drawing to draw pollen grains.


To make your life a little easier, we have gathered some of the best Tutorials on How To Draw An Eye that you must check out if you are on a spree of getting the best eye sketched on paper. If you have always wanted to draw and still want to, these dumbfounding best pencil sketch drawings to practice and learn will set you on your way.
Isn’t drawing calming to the soul and body? It has the power to lift up your spirit in all the situations. Try some of these tips and tricks mentioned above to enhance your ability to make mesmerizing yet Easy Flower Pencil Drawings for Inspiration.


